Basic LTI Portlet - Configuration and Installation
Configuration and Installation
1. Register the portlet as a publishing type
Before deploying the portlet you need to register it as a pre-configured portlet publishing type. Registering the portlet in this manner will create a new option in the initial "portlet type" screen of the portlet administration wizard and will pre-configure some of the settings of the portlet.
To do this, first create a new directory in the uPortal source tree at uportal-war/src/main/resources/org/jasig/portal/channels/basiclti. Copy the file from docs/cpd/BasicLTIPortlet.cpd in the portlet into this new directory. You will need to execute an ant deploy-war to update uPortal.
Next, import the portlet's channel type definition into your portal. From the uPortal base directory:
ant crn-import -Ddir=/path/to/basiclti-portlet/docs/type -Dpattern=basiclti.channel-type
2. Configure portlet.xml (optional)
There is an optional setting in portlet.xml you may need to modify if your personDirectoryContext.xml is configured to store the username value in a different field. The value of the init-param below must match the 'name' value of the Username attribute below so that the username is mapped correctly in different portal environments, or if your environment has this setup differently. In most cases this can be left as-is.
<init-param>
  <name>portal.attribute.mapping.username</name>
  <value>username</value>
</init-param>

<user-attribute>
  <name>username</name>
  <description>Username attribute</description>
</user-attribute>
3. Build/deploy the portlet
If you have the built WAR, you can simply drop it into uPortal tomcat/webapps, it is already configured with the Pluto Invoker. You must, however, ensure the binary portlet WAR doesn't contain a version at the end of the filename. ie it should be basiclti-portlet.war not basiclti-portlet-1.1.war, for example. If you do not do this, uPortal will be unable to find the portlet descriptor and you'll receive a similar message in the Tomcat logs.
If you build from source, run the following command to build and automatically deploy it. There is no need to run ant deployPortletApp, this takes care of it all. It will also strip the version automatically.
mvn clean install -Ddeploy -Dmaven.tomcat.home=/path/to/your/tomcat
Start uPortal and open the Portlet Manager so that we can setup an instance of the portlet.
4. Registering multiple instances of the portlet
In Step 1 we registered the portlet as a publishing type. In the Portlet Manager, you should see something similar to the screenshot below. Note the new Type.
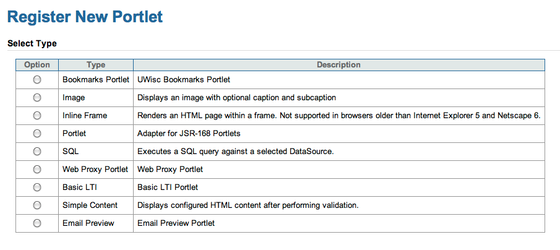
4.1 Select the Basic LTI type and follow through the screens as per you would for any other portlet. Be sure to always set Disable Dynamic Title to FALSE so you can set custom portlet titles.
4.2 This portlet supports the CONFIG PortletMode, so you will be presented with a screen similar to the screenshot below. This is where we configure this specific instance of the portlet (since we can have multiple instances all pointing to different providers).

4.3 Enter the portlet title and height and also the provider type. The provider type defines what adapter will be loaded to pre-process the launch data. Currently supported values are standard, sakai, peoplesoft. If you create an adapter, you can define your own. See also the guide on the supported providers to see what they do.
4.4 Now enter the launch data. This takes the form of a key=value pair of data, with each pair ended by a double semi-colon ;;
You must provide the endpoint_url parameter however all other parameters are dictated by the Basic LTI provider you are connecting to. In the example below have defined 'sakai' as the provider type, the context_id as ~ and the tool_id as sakai.resources. This will invoke the SakaiAdapter. In this adapter, it detects that we set the context_id to a ~ and sets a special parameter which tells the Sakai Basic LTI Provider that we want to use the current user's My Workspace site. The final parameter tells the provider that want to render the Resources tool from that site.
Example launch data:
endpoint_url=http://localhost:8081/imsblti/provider/;;
context_id=~;;
tool_id=sakai.resources;;
You must not include any user information as this will be injected by the portlet based on the current user that is using the portlet. If you need to add in any special data that is static, just add it into the launch data above. However if it needs to be injected at runtime, or determined based on come other condition, you will need to create or adjust an adapter.
4.5 Also set the shared key and secret. This should be in sync with the shared key and secret provided to the Basic LTI providers for this consumer.
4.6 Save the settings and you are now ready to drop the portlet onto your layout.
Optional setting
uPortal 3.2.5 allows the setting of a portlet parameter allowRestart. If set to true, this will render a restart icon for the portlet (screenshot below). This is particularly useful for this portlet as it is possible for the external application to timeout (or to manually logout) and this will probably prompt your for a login within the portlet. Clicking the restart icon will reinitiate the connect and sign you back in automatically. For more information, see https://issues.jasig.org/browse/UP-2934.

Notes
- Normal users cannot edit anything, including the portlet height and title so make sure you set this appropriately. A future release will allow users to set this themselves.
- See the guide on the supported providers to see how they work, so as to determine what launch data you need to provide.