JA-SIG Java Client Simple WebApp Sample
- Martin W. Kirst
- Misagh Moayyed
- Paul Furbacher
At the moment the JA-SIG Java Client 3.1 is relatively new and there are not so many examples out there. This is a simple web application, that claims to demonstrate JA-SIG Java Client 3.1 showing a public and protected page and how to generate proxy tickets for legacy services. It also was developed with minimalistic dependencies in mind and purely showing how to use the JA-SIG client. For this sample web application it's expected, that you know a little about tomcat configuration and that you read further on different sites, how to setup basic stuff (example certificates).
If you want to start modifying this example, I recommend reading Configuring the Jasig CAS Client for Java in the web.xml first.
Scenario Overview
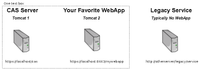
To put the test application in a bit more realistic environment, we're using two separate Tomcat servers. One Tomcat is serving only the JA-SIG CAS Server and the other one only our sample web application. In the end we will produce proxy tickets (PT) to authenticate users in a legacy application. This legacy application doesn't have to be a web application, but have to have a URL as some kind of an identifier. I will show an example later on, how such an application can consume proxy tickets.
By dividing the sample web application and CAS Server into two Tomcat instances, you can easier figure out, where a URL is pointing to. In this example all "https://localhost/" are pointing to CAS server, all "https://localhost:8443/" are pointing to this sample web application.
Preparing The Tomcat Servers
When using Tomcat as application server, I always propose to set an environment variable "JAVA_HOME", pointing to the root of your Java installation directory. I also assume, that you are using a JDK, cause you are a developer, right? ![]()
In this sample I will assume you are using a JDK (not a JRE) and running under Windows 2000/XP/2003/Vista Operating System. I also like to install all these programs directly in the root folder of drive C. So all pathnames are only recommendations.
Preparing And/Or Creating The Certificates
Now we need to create a self signed certificate, make it available for Tomcat and create a key store with trusted certificates. If this is the first time, you're doing such stuff, take a deep breath and catch up a big cup of strong coffee, you probably will need it ![]() In case you don't like coffee, strong black tea has nearly the same effect.
In case you don't like coffee, strong black tea has nearly the same effect.
I don't want to explain how to create certificates at this point, thats why I'm showing you other documents that will help you. In general you should have before OR after reading this other articles a basic understanding of what digital certificates are, how to create, use and verify them.
- X.509 Certificates (CAS user manual, general overview)
- Demo (CAS user manual, step by step installation/setup guide)
I'm using this program from Andreas Sterbenz (mentioned in Demo or google for hist name +certificate) to generate a "jssecacerts" file and place it in "%JAVA_HOME%\jre\lib\security\jssecacerts". I also was a bit lazy and didn't configure the key store and trust store file locations in Tomcat's server.xml, cause I'm counting on the "automatic discovery" from Java SE. But in the end we want to have a error free running Tomcat with a signed certificate and an accessible trusted keys storage.
Preparing CAS Server
First you should download the Tomcat server from http://tomcat.apache.org, and install it under "c:\tomcat-cas" (installing means, just unzip or use the installer). Then we need to download JA-SIG CAS Server (Download: http://www.ja-sig.org/products/cas/downloads/index.html). Copy the .WAR file from the downloaded archive and rename it to "c:\tomcat-cas\webapps\cas.war" (as also described in Demo).
Edit the file "c:\tomcat-cas\conf\server.xml" and change the following:
- In the beginning, change
to a different value, lets say port="8555". This will avoid conflicts, when using multiple tomcats
<Server port="8005" shutdown="SHUTDOWN">
- Do comment out the
We don't need HTTP connector, so comment out.
<Connector port="8080" protocol="HTTP/1.1" ....
- Do comment out the
We don't need AJP connector, so comment out.
<Connector port="8009" protocol="AJP/1.3" ...
- Uncomment the SSL connector, cause we really need it
<Connector port="443" protocol="HTTP/1.1" SSLEnabled="true" ...
Save the file and (re)start the server. I assume, that the "certstore" and "truststore" is accessible by this Tomcat (see above, creating certs).
You should now be able to connect to "https://localhost/cas" with your browser.
Preparing The Sample Web Application
Install a new and fresh copy of Tomcat into "c:\tomcat-mywebapp\". I'm using Tomcat v5.5.25, but any v6.0.x should also work fine. Cause we are installing a second Tomcat on the same box, we also have to change some setting to avoid conflicts and get it running.
Edit the file "c:\tomcat-mywebapp\conf\server.xml" and change the following:
- In the beginning, change
to a different value, lets say port="8666". This will avoid conflicts, when using multiple tomcats
<Server port="8005" shutdown="SHUTDOWN">
- Do comment out the
We don't need HTTP connector, so comment out.
<Connector port="8080" protocol="HTTP/1.1" ....
- Do comment out the
We don't need AJP connector, so comment out.
<Connector port="8009" protocol="AJP/1.3" ...
- Uncomment the SSL connector, cause we really need it and change the port to 8443
<Connector port="8443" protocol="HTTP/1.1" SSLEnabled="true" ...
Save and (re)start this Tomcat.
Download and copy the attached mywebapp.war into a temporary folder, for example "c:\temp\mywebapp.war". In order to keep the download small, I didn't include the required .JAR files. So you have to download them additionally and put them into this mywebapp.war. The structure of the mywebapp.war should look like this (after adding the .JAR files).
mywebapp.war
  |
  +---META-INF/
  .   |
  .   |---manifest.mf
  +---protected/
  .   |
  .   |---getpt.jsp
  .   |---index.jsp
  +---WEB-INF/
  .   |
  .   +---classes/
  .   +---lib/
  .   .   |
  .   .   |---cas-client-core-3.1.1.jar     (from JA-SIG Java client release 3.1.1)
  .   .   |---commons-logging-1.1.jar       (from JA-SIG Java client release 3.1.1)
  .   .   |---xercesImpl.jar                (from Apache Xerces release 2.9.1)
  .   .   |---xml-apis.jar                  (from Apache Xerces release 2.9.1)
  .   .   |---xmlsec-1.3.0.jar              (from JA-SIG Java client release 3.1.1)
  .   |---web.xml
  |---include_footer.jsp
  |---include_header.jsp
  |---index.jsp
  |---license.txt
  |---main.css
Xerces can be found at http://xerces.apache.org/xerces2-j/download.cgi (download the binaries).
After adding the .JAR files to the mywebapp.war, copy it to "c:\tomcat-mywebapp\webapps\mywebapp.war".
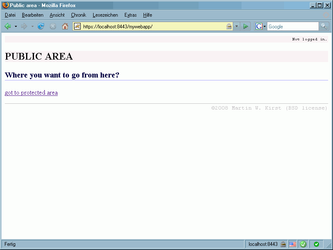
Now, you should have two non-conflicting Tomcat servers up and running, using the same certificates (this makes our life a little easier). Go ahead to "https://localhost:8443/mywebapp/". You should see the sample public page.
Result
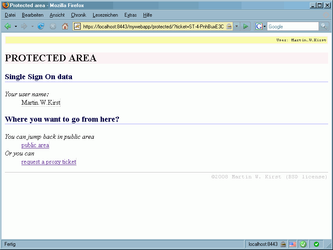
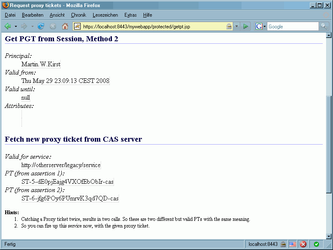
In case everything went fine, like described in this article, you should now have access to the sample application. You will enter a public page. When going to protected page, you need to authenticate yourself on CAS server (demo mode uses user name equals password, like: test/test). In protected page area you can generate proxy tickets for legacy applications.
Screenshots
For sure, that's not a genius design, but the application is minimalistic and working fine, showing you, how to use JA-SIG Java 3.1 client.
Authentication In Legacy Application
For this given scenario, you can add this method to you sources, verify the proxy ticket and get the user name from the response.
import org.jasig.cas.client.authentication.AttributePrincipal;
import org.jasig.cas.client.validation.Assertion;
import org.jasig.cas.client.validation.Cas20ProxyTicketValidator;
import org.jasig.cas.client.validation.TicketValidationException;

public class TicketValidator {
	public final boolean validateTicket(String ticket) {
		AttributePrincipal principal = null;
		String casServerUrl = "https://localhost/cas";
		Cas20ProxyTicketValidator sv = new Cas20ProxyTicketValidator(casServerUrl);
		sv.setAcceptAnyProxy(true);
		try {
			// there is no need, that the legacy application is accessible
			// through this URL. But for validation purpose, even a non-web-app
			// needs a valid looking URL as identifier.
			String legacyServerServiceUrl = "http://otherserver/legacy/service";
			Assertion a = sv.validate(ticket, legacyServerServiceUrl);
			principal = a.getPrincipal();
			System.out.println("user name:" + principal.getName());
		} catch (TicketValidationException e) {
			e.printStackTrace(); // bad style, but only for demonstration purpose.
		}
		return principal != null;
	}
}
Troubleshooting
If you get something like this NullpointerException, please apply the patch from http://www.ja-sig.org/issues/browse/CASC-50
java.lang.NullPointerException
	org.jasig.cas.client.util.HttpServletRequestWrapperFilter$CasHttpServletRequestWrapper.getRemoteUser(HttpServletRequestWrapperFilter.java:80)
	org.apache.jsp.include_005fheader_jsp._jspService(include_005fheader_jsp.java:57)
	org.apache.jasper.runtime.HttpJspBase.service(HttpJspBase.java:70)
	javax.servlet.http.HttpServlet.service(HttpServlet.java:803)
	org.apache.jasper.servlet.JspServletWrapper.service(JspServletWrapper.java:374)
...