Setup:
Microsoft Windows Server 2003 (IIS6)
Microsoft Exchange 2007
CAS 3.3.5
URL's:
Windows Domain: winserver.xtanki.local
Outlook Web Access (with the default iis cert): https://winserver.xtanki.local/owa
CAS Server (with self-signed cert): https://winserver.xtanki.local:8443/cas
ClearPass Extension: https://winserver.xtanki.local:8443/cas/clearPass
Steps:
1) Download casOwa.zip from http://github.com/wgthom/CasOwa
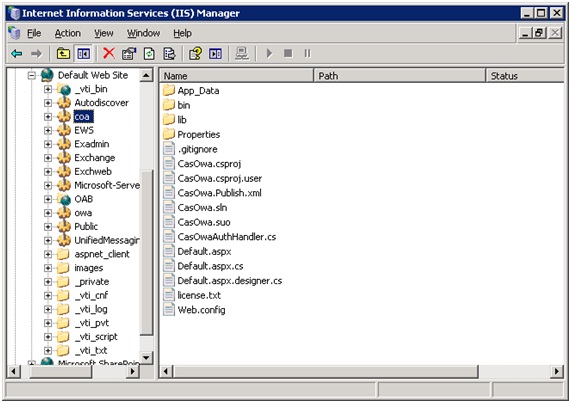
2) Unzip the directory (c:/casowa)
3) Create a Virtual Directory (coa) pointing c:/casowa in the Default Web Site tree (the same as owa).
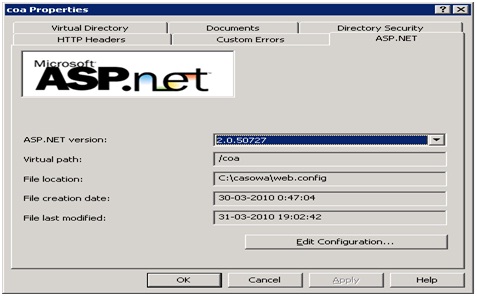
4) Right click in coa Virtual Directory and choose "Properties".
5) Select the ASP.NET tab and choose the ASP.NET Version 2.0.50727
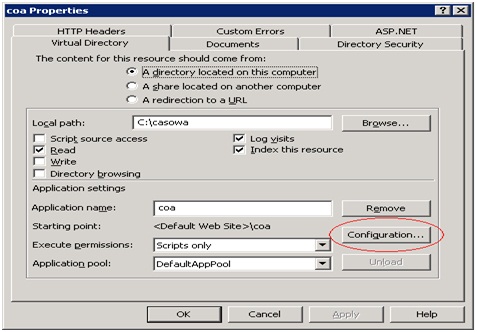
6) Now click on the Virtual Directory tab and click on the "Configuration" button.
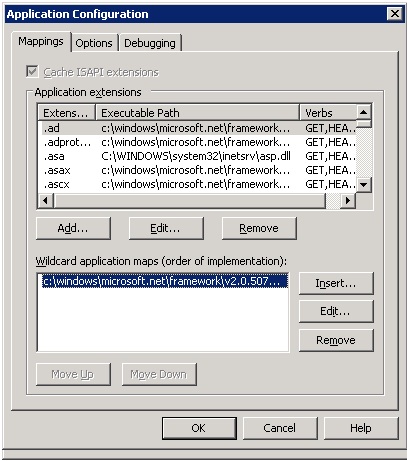
Now you have to point the .NET dll to the Wildcard Application Maps because of the custom HTTP Handlers/Mappings in CasOwa. The default location is
"c:\windows\microsoft.net\framework\v2.0.50727\aspnet_isapi.dll"
7) Now customize CasOwa's web.config file with the appropriate URL's:
<appSettings>
<add key="CasOwa.ClearPassUrl" value="https://winserver.xtanki.local:8443/cas/clearPass"/>
<add key="CasOwa.OwaUrl" value="https://winserver.xtanki.local/owa/"/>
<add key="CasOwa.skipOwaUrlCertificateValidation" value="true"/>
</appSettings>
and
<casClientConfigcasServerLoginUrl="https://winserver.xtanki.local:8443/cas/login"
serverName="https://winserver.xtanki.local"
secureUriRegex="(?i)/auth"
casServerUrlPrefix="https://winserver.xtanki.local:8443/cas/"
redirectAfterValidation="false"
useSession="false" gateway="false" renew="false"
ticketValidatorName="Cas20"
ticketTimeTolerance="5000" singleSignOut="false"
proxyGrantingTicketReceptor="true"
proxyCallbackUrl="https://winserver.xtanki.local/coa/proxyCallback"
proxyReceptorUrl="/coa/proxyCallback"/>
8) Add the IIS certificate to the JAVA truststore (using keytool)
9) Add the CAS server certificate to the Windows Cert Manager (CertMgr.exe)
10) Finally you have to allow this proxy in CAS's web.xml by adding this to CAS Validation Filter:
...
<init-param>
<param-name>allowedProxyChain</param-name>
<param-value>https://winserver.xtanki.local/coa/proxyCallback</param-value>
</init-param>
...
or
...
<init-param>
<param-name>acceptAnyProxy</param-name>
<param-value>true</param-value>
</init-param>
...
Now when you go to https://winserver.xtanki.local/coa/auth you should be redirected to the CAS Login Page and after a successful authentication you should be redirected to your mailbox https://winserver.xtanki.local/owa
More info:
http://www.mail-archive.com/cas-user@lists.jasig.org/msg04654.html
http://www.mail-archive.com/cas-user@lists.jasig.org/msg03875.html
http://jasig.275507.n4.nabble.com/DotNet-CAS-Client-for-OWA-td1015482.html


